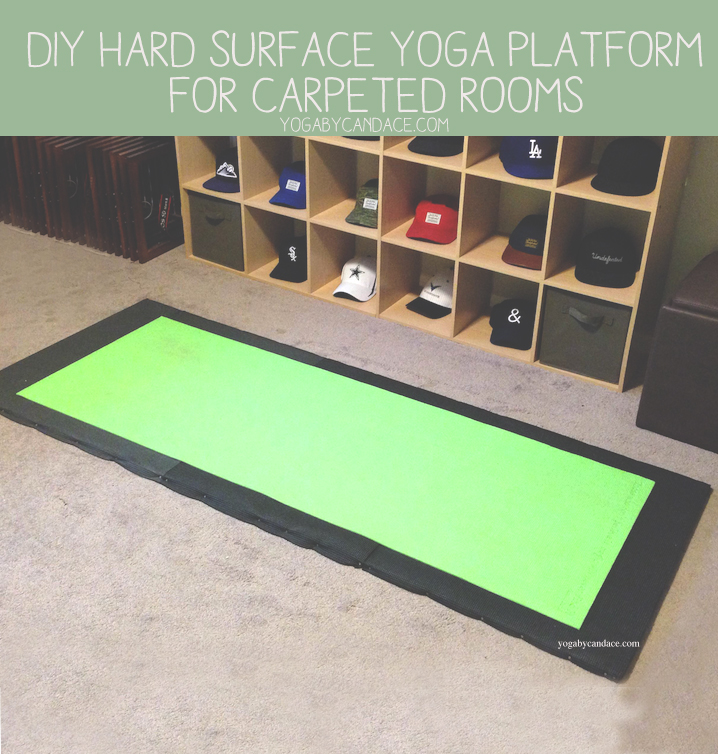
Today's guest post is from Jake, a 27 year old YBC reader from Salt Lake City, Utah. A few weeks ago, Jake had posted on the YBC Yoga Forum that he had found a solution to doing yoga on carpeted floors. His hard surface yoga platform has served him so well and was generating quite a little buzz on the forum that I thought I should ask if he'd be willing to share his step by step process with everyone on the blog. I'm so glad he said yes! I really think this will help so many people! Hope you all enjoy! And now, turning it over to Jake.
I started practicing yoga about three years ago, but only about a year ago is when I began taking it seriously. I went to a few local classes here and there to get a feel for then, and it wasn't until I started going to classes at Core Power that I really noticed my potential. Hot yoga will change your life, for sure!
Practicing yoga had helped improve my mood, my golf game, my running, and my overall outlook on life.
However, classes aren't cheap - as you know - and if this was something I wanted to start excelling at, I had to start practicing more at home. That lead to a Youtube search for yoga before bed, and that's when I discovered YBC.
At that same time, I had just moved into a great apartment. So much space but almost every inch of the floor is carpeted. Practicing at home was so much more relaxing than any class I'd been to - when you're at home, you can do whatever you want without any interruptions. You can create your ideal environment for every one of your senses. I like to become really relaxed in a somewhat dark room, either with music or a video playing - not having to worry about anyone or anything else. Being alone just allows you to reach levels you can't reach in a class.
I dealt with the carpet for a while, and it was great for the no mat foam-rolling sequence I came up with for the pre/post golf and running. But I knew that in order to improve, I would need a hard surface to practice on consistently.
I made a post on the YBC Forum, inquiring about home studios, and eventually decided to take the project into my own hands. Who wants to spend over $100 and wait for the delivery, when you could go to Home Depot and get the materials for a fraction of that? I could make something better than that, I thought. I had a general idea in my head of what I wanted to do, and the rest was kind of freestyle.
I had a few old mats laying around, and my roommate had recently moved out, leaving behind the perfect screws (he was a security installation dude), so all I needed was the board.
I decided 2.5' x 6.5' would be the best option - leaving enough room on each side of the mat. Looking back, going with 3' x 7' would be even better, or ever 4' x 8'. It's really up to you and how much space you've got. I would've mind covering half of a room or so with these boards, though!
Without further ado, here's how to make your own yoga board:
Items you will need for the yoga platform:
- electric drill (make sure it's charged, I learned this the hard way)
- measuring tape
- sharpie
- 1 sheet particle board. They come in various thickness - I went with 1/2''. Also, they are 4' x 8', but you can have them cut into whatever size you'd like.
- 2 yoga mats that you don't mind cutting
- scissors or exacto knife
- 1 box self drilling screws
- 1 yoga mat to place on top when it's finished.
One you have all the materials ready...
Pin it! Make a hard surface so you can practice yoga on carpeted floors.
Step 1: Fit your yoga mats to the board leaving extra space to cover the edges, because you will be drilling into the sides of the board. I left a little extra in hopes that I could tuck the mat underneath, but it always comes back out. You could probably improve upon it by using hot glue or gorilla glue in addition to screwing the mats down. Do whatever you think will work best.
Pin it! Make a hard surface yoga space so you can practice on carpeted floors.
Step 2: Once your mats are cut, begin screwing them into the board. Space the screws 3 - 4in apart. I did one entire side before moving on to the next, but you could do it piece by piece, too. Whatever you're comfortable with.
Pin it! Make a hard surface yoga platforms so you can practice in carpeted rooms.
Step 3: Pull the mat tightly before screwing it in on the opposite side. You don't want to leave much slack (if any) once both sides are screwed in.
Pin it! How to make a hard surface yoga platform.
Step 4: Smooth it out, make sure you're satisfied with how everything looks, then place your mat on top.
Step 5: Place your mat down and test it out!
Jake from the YBC Yoga Forum sharing his yoga platform for carpeted rooms.
I'm so glad I built this because I've used it every single day since. I can't wait to see what other color combos and materials people come with to improve on this! Please share with us over on the yoga forum!


